Our 10 year anniversary is 4 weeks from today and as I’ve said before, we decided to have a “reception” of sorts for our family and closest friends. Instead of using facebook or buying pre-made invitations, I decided to make them myself. I like to scrapbook so I didn’t think it would be that hard to come up with something I could easily do. So I searched for “cards” and found a perfect one called “Diagonal Gatefold Card”. So I used the basical design of this card to come up with my anniversary party invitations.
What you’ll need:
- double sided card stock (cut to 5 ½ X 12) 12×12 paper will give you 2 cards
- smaller blocks of card stock for the inside of the card ( cut to 4” X 5 1/4”)
- White paper on the last layer for party information (cut to 3 7/8” X 5 7/8” or smaller depending on what is written)
- extras of the small blocks of card stock for the quote on the front
- pre-printed quote stickers (or feel free to make your own)
- a spool of ribbon
I went to Michaels and purchases a couple sheets of 12×12 double sided card stock. Blue and brown happen to be a theme of ours so that’s what I picked. I cut the main paper down to the proper size and marked them 2, 4, 6, 8. 10 inches. That makes it much easier to see where to cut and fold. Once the triangles are cut out from the 4 and 8 inch marks (going diagnal to 2 3/4 inches down the side of the paper), you can fold the paper twice to make it look like this:
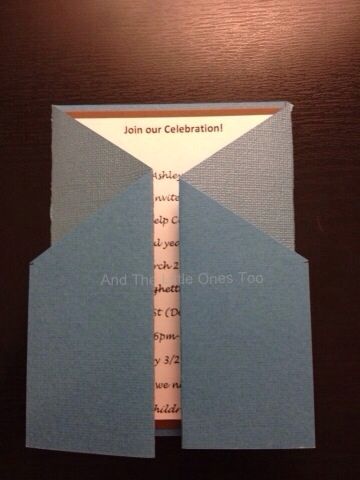
I used double sided tape to adhere the smaller block of brown cardstock an the white information paper to the inside of the card. All the information printed on the white paper was done on the computer then printed out. It made it much easier for me. I decided to ribbon to hold the card closed but having it wrapped around the card. This is the part that gets a little tricky.

I used pre-printed quotes bought from Michaels to create the front andI attached them to extra peices of the brown card stock. That gave each card a different look since none of the quotes are the same. I used a hole punch on each side for the ribbon, making sure they are somewhat even. I’m not perfect. On the back of the quote, I used double sided tape to hold the ribbon down. You can tie the ribbon as well.

I don’t thread though the other side until I made sure the ribbon is tight enough around the invitation.. but not too tight or it will make it round.

And that’s it. Add your own design in it if you’d like. They take a little but of time with cutting and such but grab a friend to help and you’ll be all set!
You’re so crafty and creative! I usually just send evites to parties, but your idea is MUCH better!
Happy Anniversary! I love printed invitations – they’re more personal than an evite. These are gorgeous!
A homemade touch to anything is really nice. Your invites came out really nice.
What a great idea. My son’s birthday is coming up in a couple of weeks and I swore this year I would actually have invitations. These look great and with a couple trucks on them would be a wonderful boys birthday party invitation made simple (sort of!).
These are beautiful! And fancy too. I love the small touches that you make with the folds and different hues. Great idea!
Those look great. They look invites made by professionals.
You’re good, you did a professional job on these. Way to go!